


How to Set up a Twitter Business Profile for Your Private Practice
Did you know that Twitter has 145 million monetizable – users who see Twitter Ads – daily active users? And that number has gone up 17% within the last year!
The same report also showed users are increasingly engaging with ads on Twitter. With Twitter ad engagement up 23% and the average cost per engagement (CPE) down 12%, there’s never been a better time to start marketing your practice on Twitter!
But before you can start using Twitter to market your practice, you’ll need to first create a Twitter business profile. Whether you are starting fresh with Twitter and need to create your first account, or you already have a personal Twitter account that you want to switch to a business account, we’re here to guide you through every step of the process!
We realize that creating new social media accounts can be daunting and even confusing at times, which is why we’re here to help. In this article, we’ll walk you through the 3 primary steps to set up your private practice’s Twitter profile properly. Then we’ll turn our focus to the 4th and final step – fine-tuning your Twitter profile to really make sure your practice stands out from the rest.
Opening a Private Practice? Sign up for our free email course to learn the 6 most important steps you should take when opening a private practice.
Step 1 – Sign Up for Twitter
Open up Twitter in your web browser and click the “Sign up” button.

Step 2 – Follow the Prompts to Create Your Account
You will then be led through Twitter’s setup wizard to create your account.
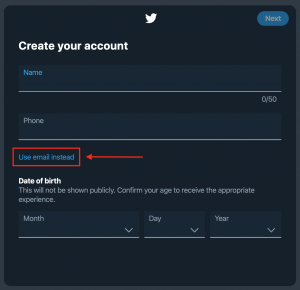
Basic Account Info
You will first be asked for your name, phone number or email address, and date of birth.
Note: Any of these can always be changed later through your account settings.
The name you use for your account can either be your actual name or the name of your practice. We recommend using your practice name, since this name will also be used for your Twitter username (@yourbusinessname).
Twitter will also ask for your phone number, but you can opt to sign up with an email address instead, if you prefer) and your date of birth.
Note: This will not be publicly displayed in your profile. It is only used to verify that you’re the one setting up the account and that you are old enough to use the platform.
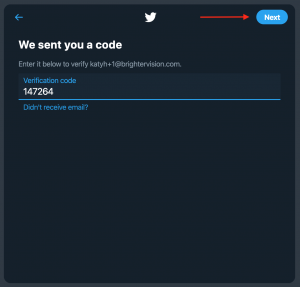
Identity Verification
Twitter will then send you a verification code. This will be sent to the email address or phone number you just used to create the account.

Copy and paste this code into your Twitter sign up tab and click “Next”.
Password
From here, you’ll be prompted to set a password and choose a profile picture for your account.
Your password must be 6 characters or more and should contain a combination of letters, numbers, and symbols.
Profile Picture
Your profile picture is the circular image that appears on your Twitter page and alongside all of your Tweets throughout Twitter:

Even more so than a username, your profile picture is the quickest way to identify an account, so it’s best to use your business logo (for group practices) or a professional headshot (for solo therapists) here.
The recommended size for this image is 400 pixels wide x 400 pixels tall. Also keep in mind that it will be automatically cropped into a circle, so make sure there isn’t anything important in the corners that will be cut off when this happens.
Bio
Then, you’ll be asked for a short bio about yourself (or your practice).
This is the short description that is displayed beneath your profile photo and username. It will also appear in Twitter search results and may even show up in Google search results, as well.
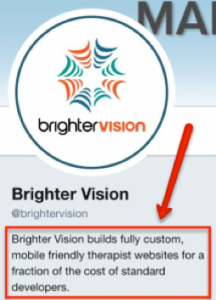
In the bio area, you have limited characters (160 characters, including spaces and punctuation) to explain your practice and capture the attention of potential new followers. So be creative and say a lot by saying a little!
Your Twitter bio should include the main keyword (or search phrase) you’ve optimized your private practice’s website for and a link to your site. You can also add a #hashtag or two to help your bio stand out from the rest, but more on hashtags in a minute.

Additional Preferences
Finally, after you’ve entered all of the above information to set up your account, there will be multiple prompts that will guide you through telling Twitter about your interests, who you’d like to follow, etc. You can finish filling this out now, or you can skip it and come back to it later.
Step 3 – Choose A Username
Once you’ve completed the setup wizard, there is one last thing you’ll want to do before moving on – edit your username.
You may have noticed that Twitter automatically created a username for your account (displayed underneath your profile photo) based on the name you provided during setup:
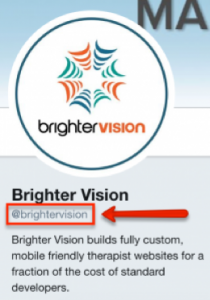
Your username is what people will use to find, follow, and communicate with you on Twitter, so it’s okay for you to be picky when choosing one. You want to pick something that you will be able to use for the lifetime of the account.
In a perfect world, you would be able to use the same username across all of your social media profiles for consistency and branding purposes:
- Twitter.com/BrighterVision
- Facebook.com/BrighterVision
- LinkedIn.com/company/BrighterVision
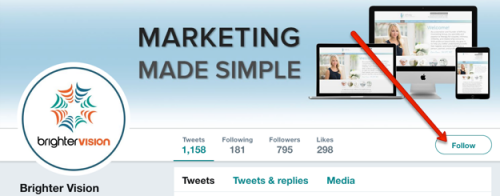
If your first choice is already taken – which happens a lot! – try adding a relevant keyword to the end or beginning. For example, our username BrighterVision wasn’t available when we signed up for Instagram, so we went with BrighterVisionWebsites instead.
If your group practice’s first choice username is already taken, try adding the words “we are” at the beginning to end up with the username WeAreBrighterVision. You can also use your location at the end of a username as a unique modifier, like BrighterVisionDenver.
Looking for more super-charged marketing tips? Take our e-course on 8 Unconventional Ways to Market Your Private Practice!
Step 4 – Edit the Details
Your Twitter profile shows visitors who you are, and first impressions count! Each element should showcase your best content and accurately reflect your practice as a whole. So, let’s finish updating all of these important pieces of your profile.
Open your profile page by clicking the “Profile” tab in the menu on the left side of your screen, then click this “Edit profile” button:
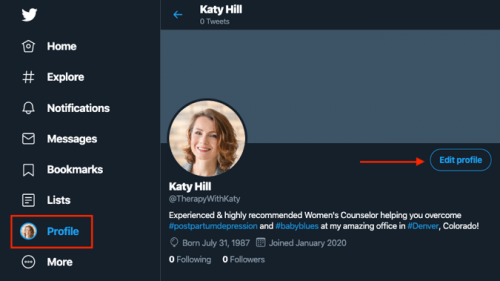
A new popup window will appear that will allow you to fill in any gaps. There are a couple of fields here that you weren’t prompted to fill in during the initial account setup:
Header Photo
First, you’ll want to click this icon to add a header photo:
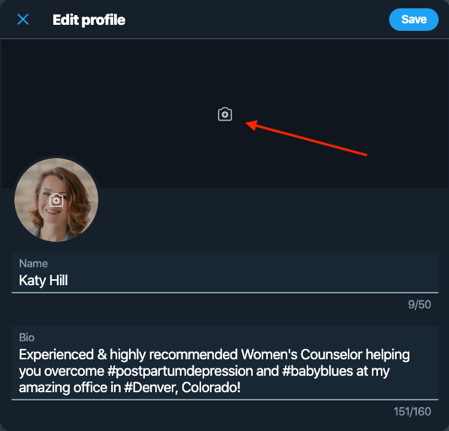
Your header photo is the large graphic at the top of your page. Its recommended dimensions are 1500 pixels wide x 500 pixels tall and this is a great space to promote your practice and really showcase your specialty.

Not everyone will see everything you tweet, but new followers will almost always go to view your profile before they decide if you’re worth following. That’s what makes extra touches like this so critical.
If you already have a color scheme and/or specific fonts you use in your branding, carry those same styles over into this image as well. The Rose Relationship Learning Center’s header (shown above) is an excellent example of someone who has done this very well. Not only does it accurately represent the practice’s overall brand, it also includes the same banner image, phrase, and fonts they’ve incorporated into their website.
Hot Tip: If “graphic designer” isn’t on your list of secondary skills, there are plenty of free online tools like Canva available to you. Just upload your own background image and use their text overlay feature to customize it to your liking. They also have many pre-made templates you can customize with your own photos and text.
Location & Website
Fill out both of these fields to let visitors know where your office is located as well as where they can visit your website for more information on your practice and the services you provide.
This information will then be displayed underneath your bio in your Twitter profile:

And that’s it – your private practice has a beautiful new Twitter profile to represent you online!
Now you’re ready to take the steps to really pump up your page into the best it can be for you and your practice.
How to Make Your Twitter Business Profile Awesome
Pin A Tweet
Keep an important Tweet at the top of your timeline by pinning it there. To do this, click the downfacing arrow on the tweet you want to pin and select “Pin to your profile page.”
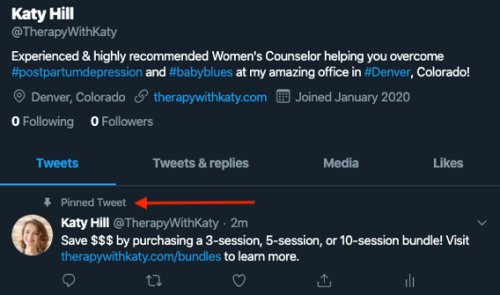
Use this feature to make sure visitors to your profile can’t miss your biggest, latest news.
Use Hashtags (the Right Way)
Hashtags make it easier for users to keep track of certain types of content and weed through the 500,000 Tweets that are being pumped out every minute so that they can find topics more relevant to their own interests.
Clicking on a hashtag takes you to the Twitter search results for that term, so using hashtags sensibly in your Tweets can get you more exposure with the right people by making your Tweets more visible to a much wider audience.
The secret to getting the most out of your hashtags is to remember that they’re not magic pixie dust – sprinkling them over everything in your Tweets will definitely not always make them better.
Twitter Hashtag Tips:

- Hashtags should be simple and direct – keep them under 18 characters to see the best user engagement
- Turn your keywords into hashtags – i.e. #DenverCouplesCounselor
- Don’t hashtag too many words – limit yourself to between 1 and 3 hashtags per Tweet
Follow & Connect With Others in Your Field
Like any social media network, it’s all about connecting with other users to share content. Luckily, Twitter is a great spot for new users to build connections and the network even gives you a head start to find influencers.
Twitter allows you to connect with others as soon as you fill out your profile. You’ll receive recommendations on who to follow, whether it’s celebrities, athletes, comedians, business leaders or musicians. However, you can browse for people that would match your business’s interests.
Some examples of who you should be following include:
- Industry leaders & influencers (i.e. Brené Brown, Hilary Hendel, etc.)
- Local professionals (i.e. Doctors, Therapists with different specialties, etc.)
- Competition
Once you begin to add people, Twitter provides helpful suggested users to follow based on your previous selections. Additionally, you can see related users when you’re on someone’s feed you follow. The process is extremely easy and unlike Facebook, Twitter is a great spot to add people you don’t quite know. The social network is more about building connections than intimate or personal networks.
Market Yourself on Twitter by Posting Regularly
The best way to market your practice’s new business page is to create a regular posting schedule.
Posting regularly and predictably not only gets your name out there so your posts can start showing up in people’s Twitter searches, but it also helps to build your brand’s reputation and trustworthiness online.
Think of it this way: how much less would you trust a business whose Twitter profile has only ever posted twice? On the flip side, how much more would you trust a business that has been regularly putting out relevant posts every week for the last 6 months?
Along with developing a dependable posting schedule, it’s also important to keep your posts thematically similar. You want to make sure you’re attracting your ideal clients by posting content that they will find interesting or helpful. If you’re posting content that’s all over the board, it will be much more difficult to build up a dedicated group of followers.
Little touches like these really help to pull your posting strategy together into something truly professional – and effective.
Want more info on how to marketing your private practice on Twitter? Check out our Definitive Guide to Twitter for Therapists.
Make Twitter Posting Easier Than Ever
If you’re looking for a way to take your Twitter and Social Media Marketing to the next level, we’ve got you covered.
Did you know that Social Genie by Brighter Vision takes away all of the pain when it comes to planning and creating social media posts for your practice?
If you’d like to get started on a 14-day free trial so that you can save yourself from the headaches and hassles of social media marketing, just fill in your info below: